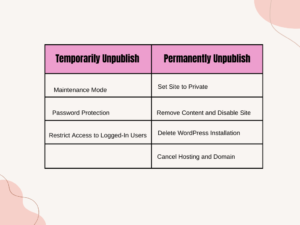
This comprehensive guide covers various methods for unpublishing your WordPress site, from temporary solutions like maintenance mode and password protection to permanent measures like setting the site to private or deleting the installation entirely. It aims to guide users through the different approaches to effectively unpublishing their WordPress site.
Temporarily Unpublish Your Site
Method 1: Using Maintenance Mode
Enabling maintenance mode on your website is a great way to temporarily unpublish your site while you update or perform maintenance tasks. This method allows you to display a customized maintenance message to your visitors while keeping your site content hidden.
- Install a Maintenance Mode Plugin:
- Go to your WordPress dashboard.
- Navigate to Plugins > Add New.
- Search for “Maintenance Mode” or “Coming Soon.”
- WP Maintenance Mode by Designmodo
- Coming Soon Page & Maintenance Mode by SeedProd
- Activate Maintenance Mode:
- After activation, go to the plugin settings.
- Customize the maintenance page if needed.
- Enable maintenance mode to display a maintenance message to visitors while you work on the site.
Method 2: Password Protect Your Site
- Install a Password Protection Plugin:
- Go to your WordPress dashboard.
- Navigate to Plugins > Add New.
- Search for “Password Protect WordPress” or “Password Protected.”
- Install and activate the plugin.
- Activate Password Protection:
- After activation, go to the plugin settings.
- Set a password and enable protection. Users must enter a valid password to access the site.
Method 3: Restrict Access to Logged-In Users
- Install a Membership Plugin:
- Go to your WordPress dashboard.
- Navigate to Plugins > Add New.
- Search for “Members” or “Restrict Content.”
- Install and activate the plugin.
- Restrict Site Access:
- After activation, go to the plugin settings.
- Configure the settings to restrict access to logged-in users only.
- This will make your site accessible only to registered users.
Permanently Unpublish Your Site
Method 4: Set Your Site to Private
- Change Privacy Settings:
- Go to your WordPress dashboard.
- Navigate to Settings > Reading.
- Please ensure that the box “Discourage search engines from indexing this site” is checked.
- Click Save Changes.
- Set Pages and Posts to Private:
- Edit each post and page.
- Change the visibility to “Private” and update the content.
Method 5: Remove Content and Disable Site
- Backup Your Site:
- Use a plugin like “UpdraftPlus” or “BackWPup” to create and download a backup.
- Delete All Content:
- Go to Posts and Pages in your dashboard.
- Select all content and move to trash.
- Empty the trash to delete the content permanently.
- Turn off the Site:
- Add a line to your .htaccess file to deny access to all visitors:
- apache
- Copy code
- deny from all
Method 6: Delete WordPress Installation
- 1. Backup Your Site:
- Create and download a backup using a plugin like “UpdraftPlus.”
- Delete Files and Database:
- Access your web hosting control panel (e.g., cPanel).
- Use the File Manager to delete WordPress files (usually in public_html or a specific directory).
- Access phpMyAdmin to delete the WordPress database.

How to Unpublish your wordpress site
Method 7: Cancel Hosting and Domain
- Cancel Hosting:
- Log in to your hosting account.
- Navigate to the hosting services and cancel the hosting plan associated with your WordPress site.
- Cancel Domain:
- If you no longer need the domain, let it expire or cancel it through your domain registrar.


Play the best games and claim amazing bonuses on evo888 download now!
Licensed software developers back these games, guaranteeing fairness and high quality.